The Steam Deck, renowned for its robust handheld gaming capabilities, offers more than just local gameplay. This tutorial will guide you in setting up GeForce Now on your Steam Deck, enabling you to access a broader range of games via cloud streaming.
Key Considerations for Integrating GeForce Now with Steam Deck
Although GeForce Now is available on various platforms like Android and iOS, the Steam Deck does not have a dedicated app for it.
Instead, this setup involves adding a Microsoft Edge browser to your Steam Deck’s library, which will be configured to automatically launch GeForce Now.
Microsoft’s collaboration in optimizing Edge for the Steam Deck, initially aimed at Xbox Game Pass compatibility, also paved the way for a seamless integration of GeForce Now. The procedure is relatively safe, involving only app modifications and not altering the Linux-based SteamOS.
For a smoother experience, connecting a Bluetooth mouse and keyboard is recommended. Alternatively, you can use a USB mouse and keyboard with a compatible Steam Deck dock. Most third-party docks with USB ports should suffice.
If you don’t have these peripherals, the built-in virtual keyboard can be used, though it might be slightly less convenient. You can access this keyboard anytime by pressing Steam + X on the Steam Deck.
Steps to Add GeForce Now to Your Steam Deck Library
Begin in desktop mode by pressing the Steam button, navigating to Power, and selecting Switch to Desktop.
- Move your cursor to the Discover Software Center icon at the bottom left corner and click on it.
- In the Software Center, go to Applications and then to Internet. Look for Web Browsers.
- Locate and select Microsoft Edge, and then click Install to proceed.
After successfully installing Microsoft Edge, the following step is to add it to your Steam library as a separate entity, enabling you to create and open a specific shortcut for it.
Here’s how to proceed:
- Close the current window.
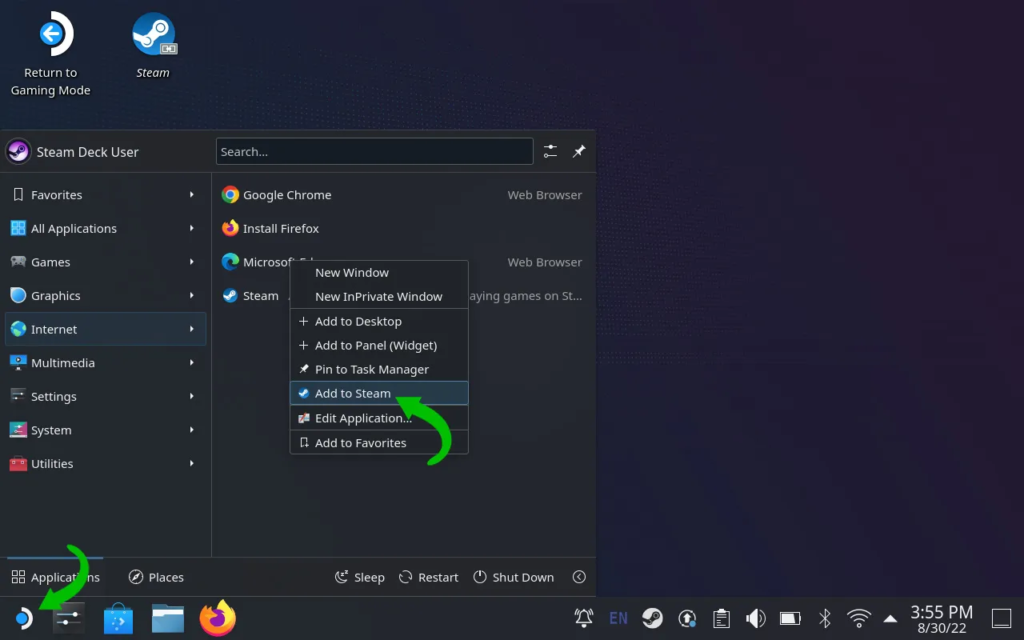
- Locate the Application Launcher icon, which is situated at the very bottom left of the screen, and click on it.
- Navigate to the Internet section. Here, you should find Microsoft Edge. Right-click on it and select the option “Add to Steam.”
Note: If you are using the Steam Deck’s built-in keyboard and trackpads, you can perform a right-click by pressing down on the left trackpad. This step integrates Microsoft Edge into your Steam interface, making it easier to access GeForce Now directly from your Steam Deck.
For the next step in setting up GeForce Now on your Steam Deck, you’ll need to grant Microsoft Edge additional permissions through the SteamOS console application. This involves using the Konsole app to enter specific commands. Here’s how to do it:
- Close any open windows and return to the desktop environment.
- Click on the Application Launcher icon located in the bottom left corner of the screen.
- Within the Application Launcher, navigate to the “System” section.
- Find and click on “Konsole” to open the console application.
- In the Konsole, type the following command:
flatpak --user override --filesystem=/run/udev:ro com.microsoft.Edge

Having enhanced Microsoft Edge’s permissions, the next crucial step is to customize the newly created shortcut so that it specifically launches GeForce Now. Here’s how to modify the shortcut:
- At the top of the desktop, locate and open the Steam shortcut.
- Go to the ‘Library’ section within Steam.
- Find the Microsoft Edge entry in your library, right-click on it, and select ‘Properties.’
- Make the following changes in the Properties menu:
- Rename the shortcut to “GeForce Now” to reflect its new purpose.
- In the ‘LAUNCH OPTIONS’ field, append the following parameters to the existing command:
--window-size=1024,640 --force-device-scale-factor=1.25 --device-scale-factor=1.25 --kiosk "https://www.play.geforcenow.com"

The final steps in setting up GeForce Now on your Steam Deck involve configuring the control scheme to ensure that games can be played effectively. This includes modifying the controller settings to accommodate the absence of a dedicated GeForce Now menu button. Here’s how to complete this setup:
- On the desktop, locate and click “Return to Gaming Mode.” This option will switch you back to the Steam Deck’s gaming interface.
- Once in Gaming Mode, navigate to your Steam Library and find the GeForce Now shortcut you just renamed.
- Next to the GeForce Now entry, click on the controller icon. This opens the controller configuration settings.
- In the controller settings, go to the “Templates” section and select “Gamepad with Mouse Trackpad.” This template configures the controller to function as a gamepad with an additional mouse trackpad feature, suitable for navigating GeForce Now’s interface.
- Enable the “Back Grip Buttons” by tapping the toggle next to it. This feature adds extra functionality to the Steam Deck’s rear buttons.
- Assign the L4 button to act as the Esc (Escape) key. To do this, change the L4 button’s mapping to the Esc key. This setting is crucial because the Steam Deck lacks a dedicated GeForce Now menu button. Assigning the Escape function to the L4 button allows you to hold it down to exit games.
By following these steps, you have successfully configured your Steam Deck to use GeForce Now, enhancing your gaming experience with additional cloud-based games. The custom control setup ensures seamless gameplay, allowing you to enjoy a wide range of titles available on GeForce Now.
Personalizing your Steam Deck’s GeForce Now shortcut with official-looking artwork adds a professional touch to your setup.
Here’s how to add GeForce Now icons to your shortcut:
- Downloading the Icons:
- Open Microsoft Edge on your Steam Deck (accessible in desktop mode via the Application Launcher).
- Download the following icons: Square icon, Vertical icon, and Banner icon.
- Alternatively, you can transfer these images to your Steam Deck using a USB flash drive.
- Adding Artwork to the GeForce Now Shortcut:
- In desktop mode, open Steam and locate GeForce Now in your Library.
- Right-click on GeForce Now and select ‘Properties.’
- To change the application icon, click on the gray box next to the title. Navigate to where you saved
gfn-square.jpgand select it. Make sure to check the file path under “/home/deck/” for the Downloads or Documents folder, and ensure the file browser is set to show “all files.”
- Setting a Custom Background and Artwork:
- On the GeForce Now application page (where the Play button is), right-click on the dark background. Select ‘Set Custom Background’ and choose the
gfn-wide.jpgfile. - Return to the main Steam Library page. Find the GeForce Now entry under the All Games section, right-click it, select ‘Manage,’ and then ‘Set custom artwork.’ Choose the
gfn-vertical.jpgfile. - Repeat the process for the GeForce Now box under the Recent Games section (note: GeForce Now needs to be the last played item to see the wide recently played icon).
- On the GeForce Now application page (where the Play button is), right-click on the dark background. Select ‘Set Custom Background’ and choose the
After completing these steps, your GeForce Now application should appear fully integrated into your Steam library, with professional-looking icons and artwork.
Remember, as you play different games on GeForce Now, you might need to adjust the controller settings. The Esc key typically allows returning to the homepage, but this can vary by game. While this method provides a functional way to play GeForce Now games on the Steam Deck, it’s a workaround and not an officially supported version. Nonetheless, it should offer a satisfactory gaming experience.