Unlocking Minecraft Java Edition on your Steam Deck is a straightforward process with the Prism Launcher. While the official game is not available on the Steam store, this guide will walk you through each step to seamlessly install, set up controls, and add custom library artwork to enhance your gaming experience.
Installing Minecraft with Prism Launcher
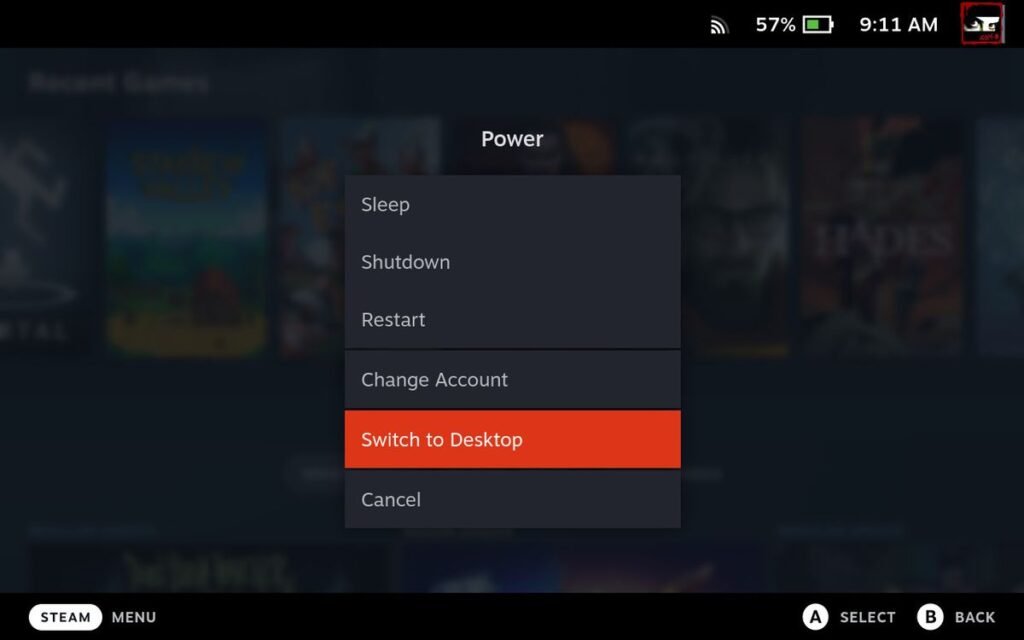
To initiate the process, switch to Desktop Mode from the Steam Deck power menu by pressing the left-side STEAM button, navigating to Power, and selecting Switch to Desktop. Open the Discover app, locate Prism Launcher, and install it. Follow the steps within Prism Launcher to add your Microsoft account, ensuring a seamless login. Additionally, customize game-specific settings to optimize your Minecraft experience.
After a brief pause, the Steam Deck will initiate its Linux desktop environment, mirroring the familiar experience found on a typical PC.
To proceed, locate and open the Discover app, usually situated on your taskbar with an icon resembling a blue shopping bag. Alternatively, access it through the System tab in the applications menu. Within the Discover app, utilize the search function at the top-left to find Prism Launcher. Once located, select Prism Launcher from the list of results and proceed to install it.
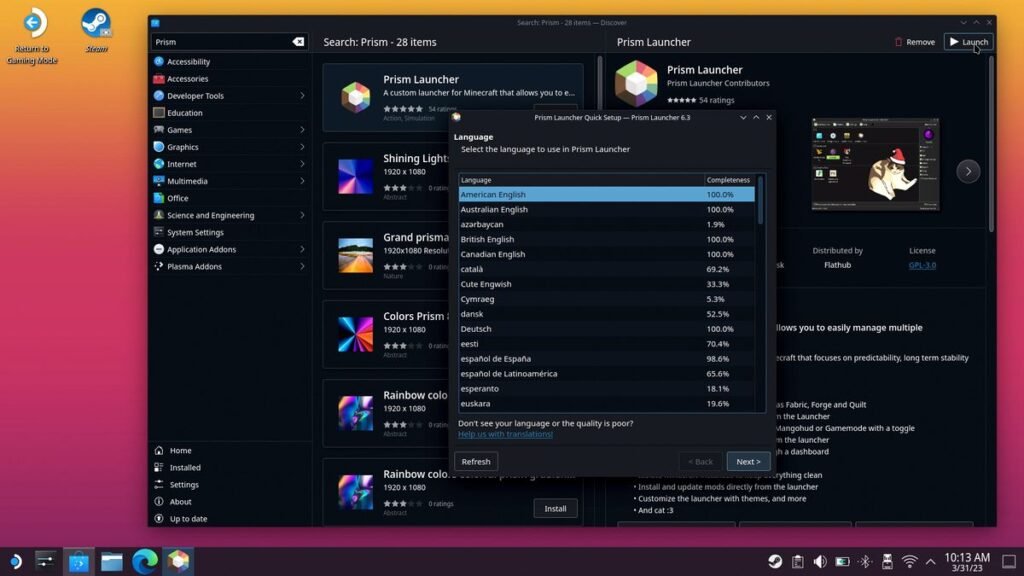
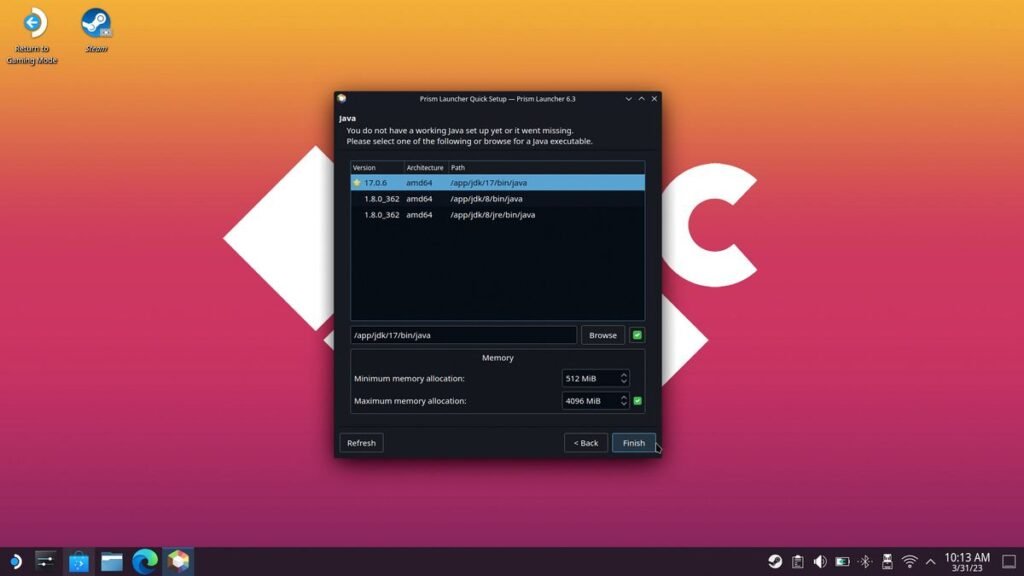
On the Prism Launcher page, either click the Launch option at the top right of the Discover app or locate it in your app drawer. Choose the suitable language for your location and proceed by clicking Next. If Java is not installed, opt for the recommended (⭐) version and complete the process by clicking Finish.
Within Prism Launcher, navigate to the top right and click on “Accounts,” then choose “Manage Accounts.” Select “Add Microsoft” (for modern accounts) and click on the login link to open your browser. Copy and paste the provided code into your browser, and proceed to complete the login process.
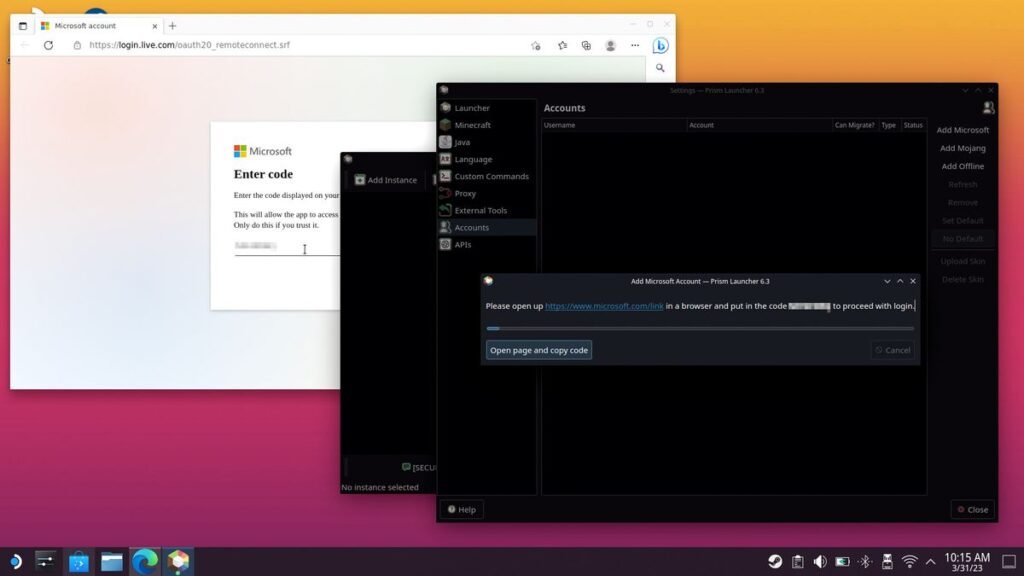
Your Microsoft account should now be visible in the list with a ‘Ready’ status. If it isn’t, revisit the steps mentioned above to confirm the accuracy of your credentials and ensure there is a valid Minecraft purchase linked to that account. Do not close the Prism Launcher settings page yet; an additional step will simplify launching the game on your Steam Deck.
Navigate to the left-side settings panel and click on “Minecraft” to access game-specific adjustments. Scroll down to the bottom, under “Miscellaneous,” and mark both boxes related to closing the launcher. Finally, click “Close” in the bottom right corner to exit the Settings menu.

In Prism Launcher, select “Add Instance” at the top left of the main window. Choose your preferred Minecraft version, or stick with the recommended (⭐.) Once a version is selected, click “OK” at the bottom of the New Instance window. Your chosen Minecraft version will now be visible in Prism Launcher, ready for play. If you wish to verify the game’s functionality, click “Launch” on the right side of the main window with the instance selected. This typically launches the game in Desktop Mode, often requiring a mouse and keyboard.
Alternatively, let’s integrate it into the Steam Deck games library for play in Gaming Mode, utilizing the console’s buttons, touchpads, and analog sticks. Close any open Minecraft and Prism Launcher windows, and instead, launch the desktop Steam app.
While you could conclude the process at this point, repeatedly switching to Desktop Mode each time you want to play Minecraft is less than optimal. Moreover, for more seamless access to Steam Deck’s controller support and the ability to leverage community-made controller profiles, a few additional steps can be taken to integrate Minecraft into the SteamOS games library.
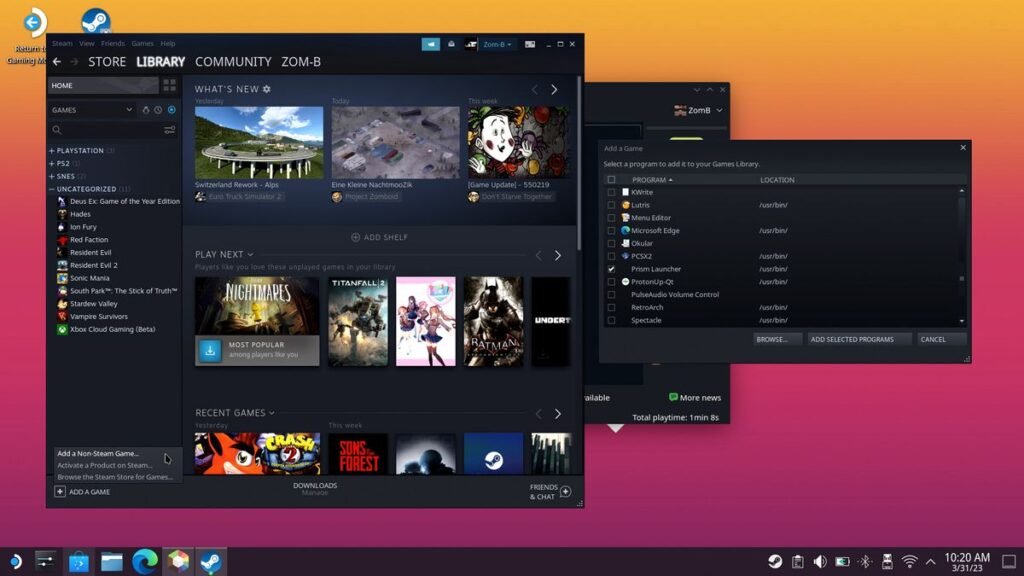
Within the desktop Steam app, locate and click “Add a Game” in the bottom left. From the drop-down menu, select “Add a Non-Steam Game…” In the ensuing window, locate and choose Prism Launcher. Complete the process by clicking “Add Selected
To streamline the process of launching directly into Minecraft without first opening the Prism Launcher, we can include an argument in the launch options. This small piece of code enables us to boot directly into our chosen game version, particularly beneficial if you don’t use multiple instances.
For this guide, we are utilizing Java version 1.19.4, but your instance may vary, so use the corresponding number.
Follow these steps:
- Right-click on Prism Launcher in your library.
- Left-click on Properties.
- In the Launch Options box, scroll to the far end of the text.
- Add the following code:
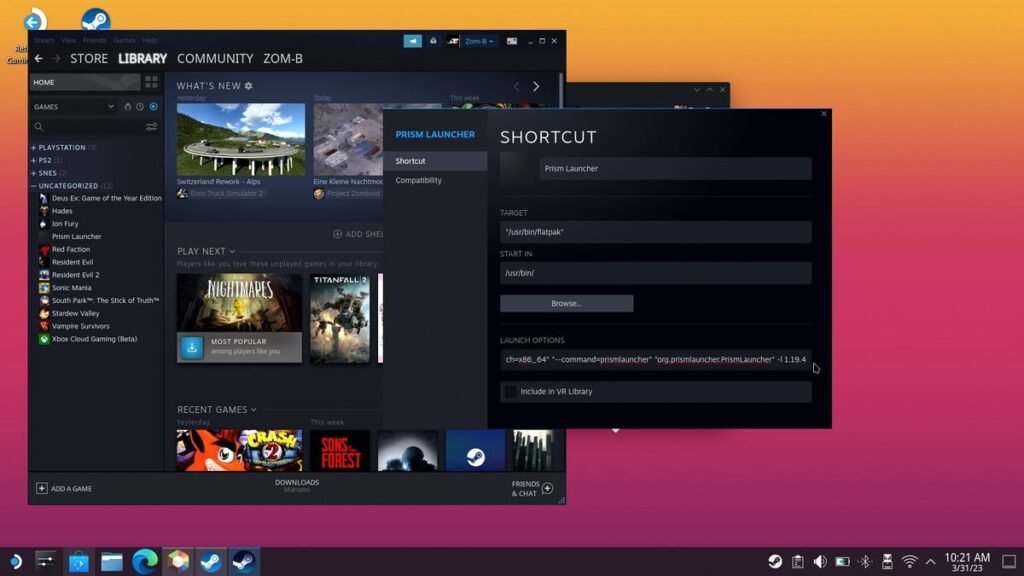
-l 1.19.4If done correctly, it should resemble something like this:
"run" "--branch=stable" "--arch=x86_64" "--command=prismlauncher" "org.prismlauncher.PrismLauncher" -l 1.19.4
Ensure the version number matches the one you selected when adding the instance earlier. If you have customized your Steam Deck operating system, your complete launch option command may look slightly different, but the lowercase “l” and version number are crucial.
Once more, if the version number of your Minecraft instance differed from the guide when you selected “Add Instance” earlier, it must be manually adjusted in the Launch Options. If you’ve made additional customizations to your Steam Deck operating system, your complete launch option command might appear slightly different, but it is crucial to maintain the “-l” (lowercase L) and the correct version number for accurate execution. Ensure consistency with the version you initially selected when adding the instance for a seamless experience.
HOW TO SET UP STEAM DECK CONTROLS FOR MINECRAFT
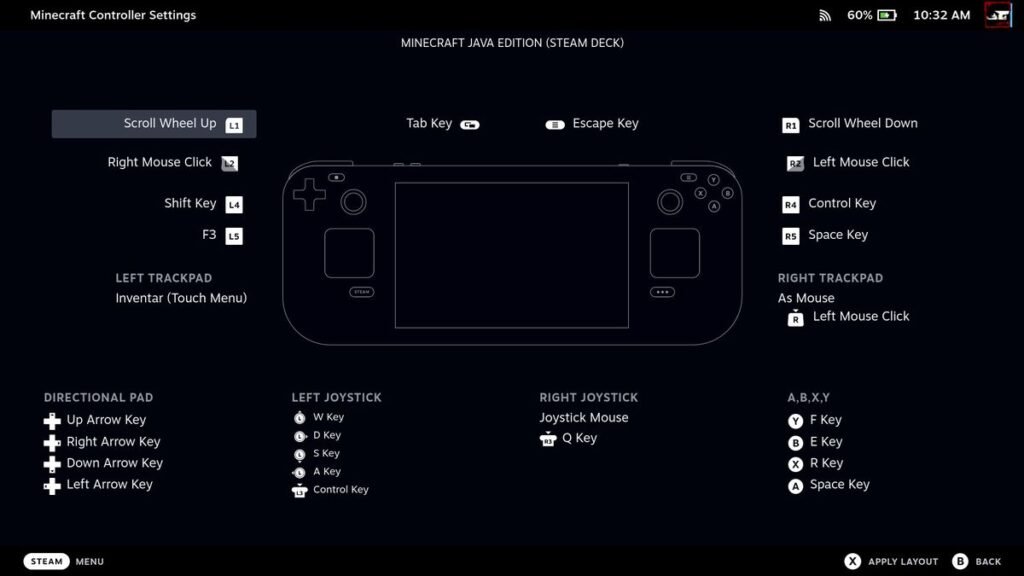
Just like any game installed on the Steam Deck, you have the option to tailor a custom set of inputs for titles originally designed for a mouse and keyboard. Alternatively, you can opt for a pre-made community profile to jump directly into the game. Here’s a step-by-step guide:
- Navigate to the SteamOS UI, select Prism Launcher, and go to Controller Settings on the right.
- Click on “Current Layout” to view a list of generic Templates crafted by Valve.
- Press the right bumper (R1) to access Community Layouts.
- Choose a community-created controller profile from the list and press A to select it.
- If you are satisfied with the controls, press X to Apply Layout.
- Launch Minecraft to test the inputs, and utilize Edit Layout if any adjustments are necessary.
HOW TO SET CUSTOM LIBRARY ARTWORK FOR MINECRAFT
While utilizing Prism Launcher to launch directly into Minecraft on your Steam Deck is convenient, it may appear less visually appealing on the SteamOS UI without custom artwork and a name change. Here’s how you can set custom library artwork and adjust the text:
- Press the left-side STEAM button to open the quick menu.
- Scroll down the list and select “Power.”
- On the power menu, navigate to and select “Switch to Desktop.”
- Open the Steam desktop app and right-click on Prism Launcher, then click on “Properties.”
- In the top field, rename the shortcut from “Prism Launcher” to “Minecraft.”
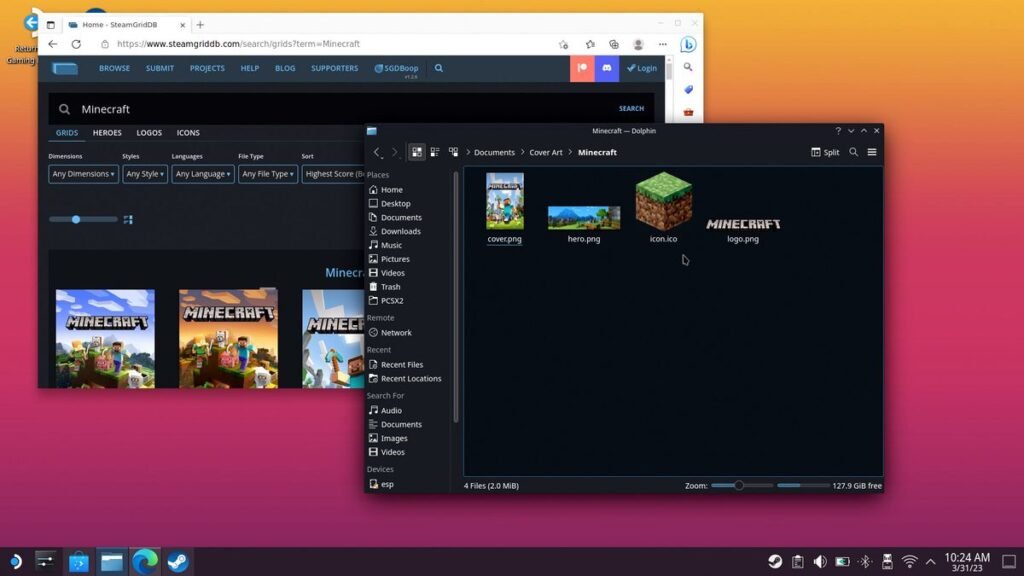
For custom artwork, you have the option to either create your own or save time by visiting SteamGridDB and downloading images provided by the community. Explore various variants from categories like grids, heroes, logos, and icons, and save the selected images to your Steam Deck. Keep in mind the location of these files as you’ll need them shortly.
Return to the Steam desktop app and locate Minecraft in your library. Right-click in the space where game artwork typically appears and choose “Select custom art” from your directory. Icons can be set through the game properties window, where you renamed the shortcut, by clicking the grey square in the top left.
If your icon doesn’t appear in the folder, adjust the File type drop-down menu to “All Files (.)” instead of *.tga or *.png. Many icons from SteamGridDB are in the .ico format, and this change ensures their visibility.